Step-by-Step Guide: How to Make Mexican Wedding Cookies
Mexican wedding cookies, also known as Herepolvorones or Russian tea cakes, are delicate, crumbly, buttery cookies popular in Mexican and other cuisines. Despite their name, they are not exclusively served at weddings but are enjoyed on various occasions.
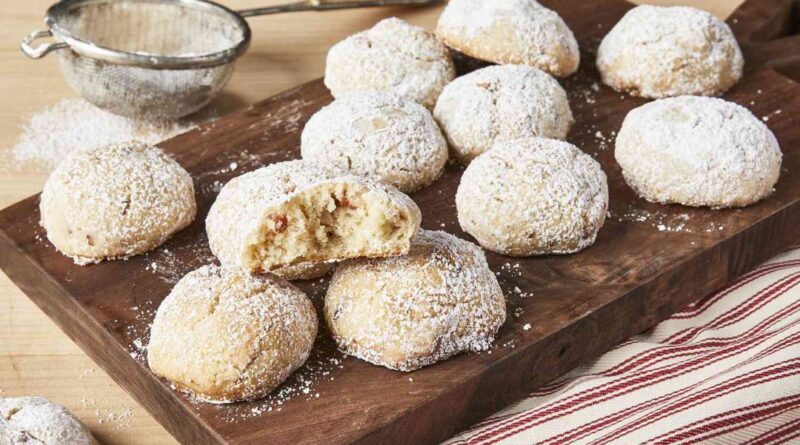
Step-by-Step Guide To Mexican Cookies
Here are the Step-by-Step Guidelines for How to Make Mexican Wedding Cookies.
Ingredients
- 1 cup unsalted butter, softened
- 1/2 cup powdered sugar, plus more for coating
- Two teaspoons of vanilla extract
- 2 cups all-purpose flour
- 1/4 teaspoon salt
- 1 cup finely chopped nuts (such as pecans or walnuts)
Popular Recommendation: Most Popular Food Trends On Social Media
Step 1: Preheat the oven and prepare baking sheets wedding cookies
Preheating the oven is important to ensure that the cookies bake evenly. Set the temperature to 325°F (160°C) and allow the oven to preheat. Meanwhile, line two baking sheets with parchment paper or silicone baking mats. These will prevent the cookies from sticking to the baking sheets and make clean-up easier.
Step 2: Cream the butter and sugar
Add the softened butter and 1/2 cup of powdered sugar in a large mixing bowl. Softened butter should be at room temperature, which allows it to mix more easily. Use a medium-speed electric mixer or a wooden spoon to beat the butter and sugar together. Continue mixing until the mixture becomes light and fluffy. This process, called creaming, helps incorporate air into the dough, resulting in a tender texture.
Step 3: Add vanilla extract and mix
Once the butter and sugar are creamed, add two teaspoons of vanilla extract to the mixing bowl. Vanilla extract adds a delicious flavor to the cookies. Mix again until the vanilla extract is well incorporated into the dough.
Step 4: Incorporate flour and salt
Sift 2 cups of all-purpose flour and 1/4 teaspoon of salt in a separate bowl. Sifting helps to remove any lumps and aerate the flour, resulting in lighter cookies. Add the sifted flour and salt mixture to the butter-sugar mixture. Stir or mix on low speed until the ingredients are combined. Be careful not to overmix; stop mixing once the dough comes together and there are no dry patches.
Step 5: Add chopped nuts
Finely chop 1 cup of nuts, such as pecans or walnuts. The nuts add a delightful crunch to the cookies. Add the chopped nuts to the dough and gently mix them until evenly distributed. Mixing the nuts too vigorously may crush them, so be gentle to maintain their texture.
Step 6: Shape the dough into balls
Take about a tablespoon of dough and roll it between your palms to form a ball. The size can vary depending on your preference, but aim for uniformity to ensure even baking. Place the dough balls onto the prepared baking sheets, spacing them about 1 inch apart. The cookies will spread slightly as they bake, so leaving enough space between them prevents them from sticking together.
Step 7: Bake the cookies
Place the baking sheets with the dough balls in the preheated oven. Bake for approximately 15-18 minutes or until the cookies are set and lightly golden on the bottom. Keep an eye on them to avoid overbaking. To ensure even baking, rotate the baking sheets halfway through the baking time, switching their positions in the oven.
Step 8: Cool and coat with powdered sugar
Once the cookies are done baking, remove them from the oven and let them cool on the baking sheets for a few minutes. They will be delicate at this stage, so allowing them to cool slightly will make them easier to handle. While the cookies are still slightly warm, roll them gently in powdered sugar until they are well coated. The powdered sugar will stick to the cookies, giving them a lovely appearance and a touch of sweetness.
Step 9: Coat with powdered sugar again
Once the cookies have cooled completely, roll them in powdered sugar for a second time. The initial coating may have absorbed into the warm cookies, so this second coating ensures a generous sugar dusting. Rolling them in powdered sugar again provides a beautiful snowy appearance and adds extra sweetness.
Step 10: Serve and enjoy!
Arrange the Mexican wedding cookies on a serving platter or store them in an airtight container. These delicious cookies are ready to be enjoyed!
That’s it! You’ve successfully made Mexican wedding cookies. Enjoy these tasty treats with a cup of coffee or tea.
Note: Mexican wedding cookies are delicate and crumbly, so handle them gently when coating them with powdered sugar.
Must Read: Complete Beginners Guide To Ketogenic Diet